Want to make the transition to a climate-friendly home, but not sure where to start? Get Your Electrification Roadmap®

Introducing…the heat pump!

“What is a heat pump?”

“What is a mini split?”

“How does a heat pump work?”

“Should I get a heat pump?”
Buzz Lightyear and Woody with meme caption "heat pumps, heat pumps everywhere"


Maybe you’ve heard your friends talking about how their furnace finally died and they made the switch to a heat pump. Perhaps you’ve searched “furnace replacement” and seen the words “heat pump” and been intrigued. You might be looking for ways that can become a better steward to our planet. Or maybe you know the smallest bit about these electrified powerhouses but you don’t quite know where to start.

Don’t worry. We’ve got you covered.

Introducing the best way to take a big bite out of climate change – the heat pump!

Heat pumps are the hot new thing and will be your coolest appliance. And, did you know that the technology behind heat pumps is actually over 100 years old? That’s right – heat pump HVAC systems are in fact not brand new, but rather they have been massively improved over the past 60 years (and especially over the past 10 years).

What is a heat pump?

A classic question! We’re here to make it make sense…without hurting your brain too much.

Air source heat pump systems replace your current furnace (or boiler) and any air conditioning units in your home. They’re powered solely by electricity, which means you’re no longer burning stuff to stay warm, and you’re not using an entire second appliance just to stay cool. That’s right – these heat pumps can both heat and cool your home! But…how?

How does a heat pump work?
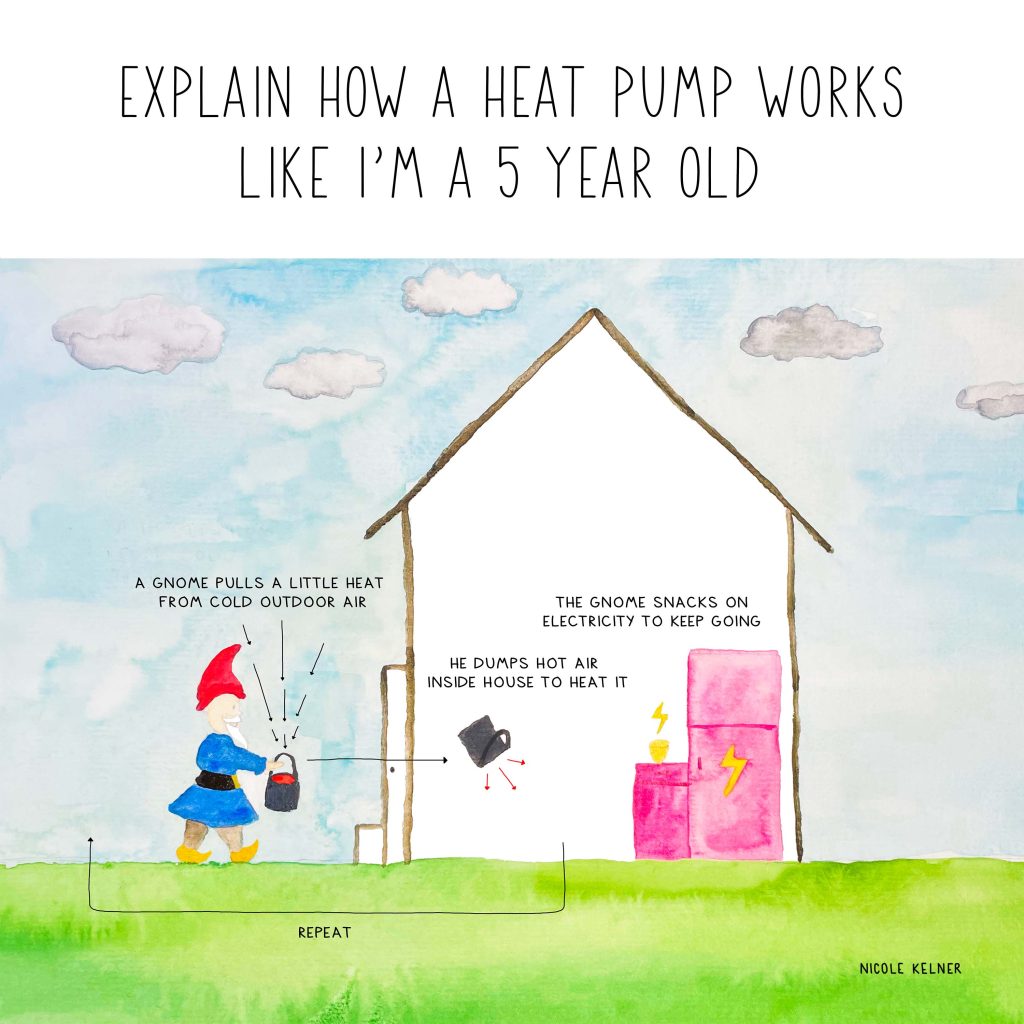
Artwork by Nicole Kellner - "Explain how a heat pump works like I'm 5 years old"
Hint: it’s not actually little gnomes

Unlike a furnace or boiler, heat pumps don’t burn fossil fuels, which make them a healthier choice for your family and the environment.

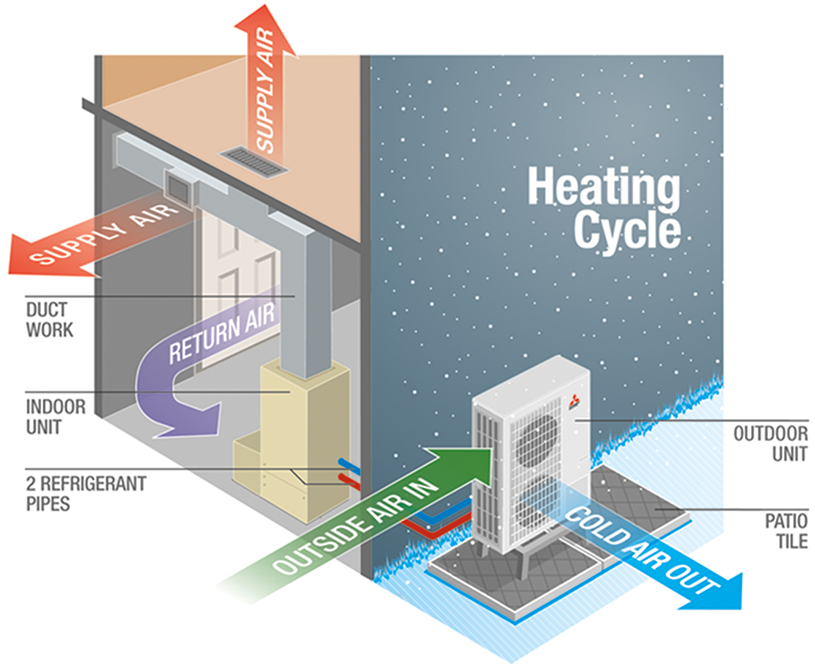
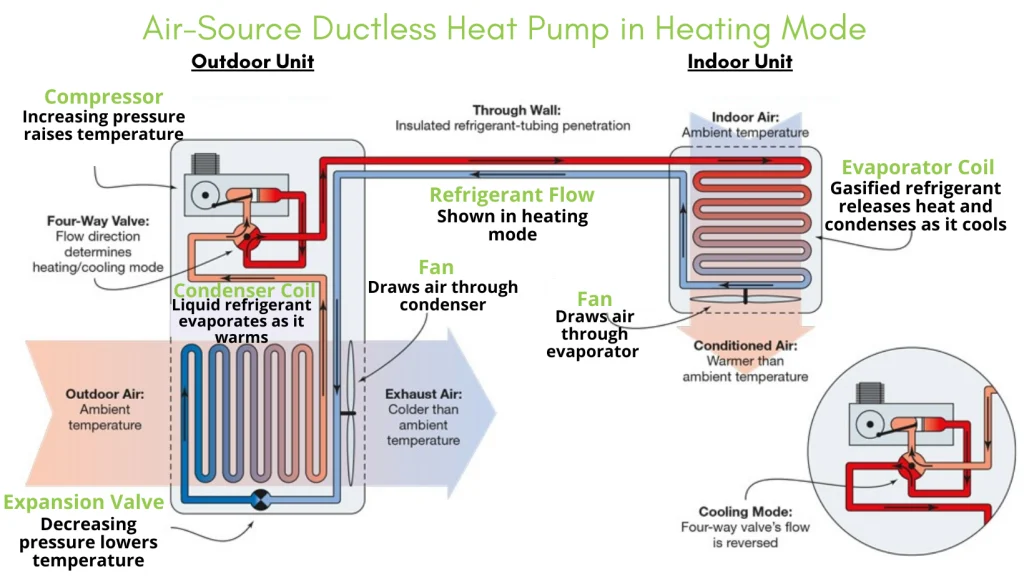
Instead, powered by electricity, air source heat pumps move heat from the air outside of a home to inside and vice versa to heat and cool. Check out the image below for a more visual explanation:
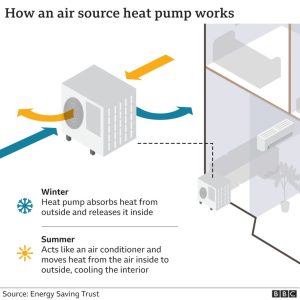
How an air source heat pump works. Image source: Energy Savings Trust, BBC

That’s right – a heat pump doesn’t generate heat, it moves existing heat. Even on the very coldest days in very cold places (like Denver and Boston) , there are heat particles in the air. The right cold climate heat pump can take these and move them inside of your home to keep it warm. And in the summer, heat particles are moved from the inside of your home to the outside. Pretty cool (and hot), huh?

What does a heat pump system look like?

There are two common types of air source heat pumps. The first is a ducted system. This works best in homes that already have ductwork and utilize central heating and cooling system, which makes for a pretty seamless transition.

However, if your current ductwork is in poor condition or your home doesn’t have ducts (think, folks with hydronic boiler systems), the right move for your home is likely a ductless mini split heat pump system. Mini splits consist of an indoor unit, usually mounted on your wall or ceiling, and an outdoor unit. They’re connected, and they provide heating and cooling to whichever rooms they’re installed in–without using any ducting. Want to learn more about mini split heat pumps specifically? Check out our ultimate guide here.
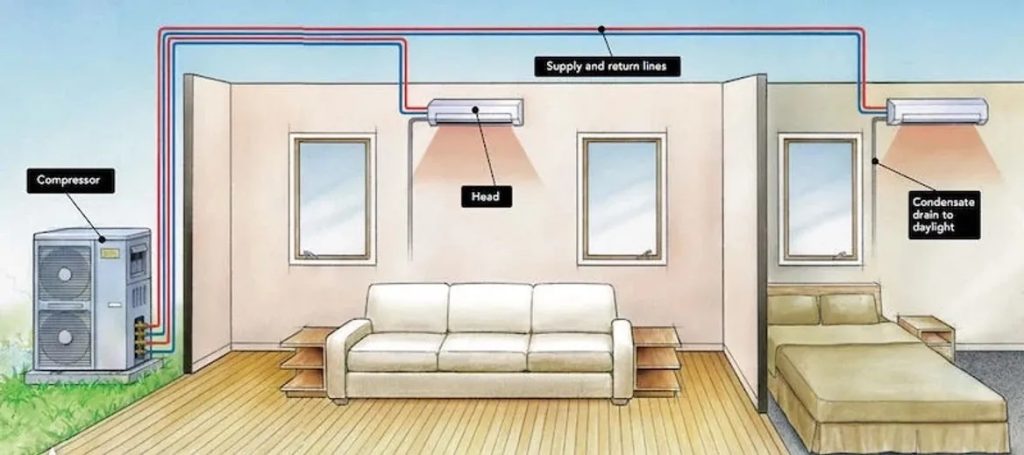
Ductless mini split heat pump system, image from Canary Media.
No ducts? No problem! Here’s what a mini split would look like in a room in your home.

Mini split heat pumps systems as well as ducted air source heat pump systems all have easy filters to clean and upkeep, ensuring the long life of these awesome electric appliances.

A quick note on energy efficiency

Remember, part of upgrading to a climate-friendly home means you shouldn’t produce more energy than you need. For example, you wouldn’t leave your front door wide open with the AC blasting in 95 degree summer, would you? Probably not. That’s a poor use of energy and not efficient!

Efficiency for energy goes beyond weatherization– it means taking care of what we have and using it to the best of its ability within its lifetime.

The best part about your awesome, energy-efficient heat pump? It’s your electric heater and your electric air conditioning system all in one.

Hey, that’s right. It’s electric!

So, it’s electric…why should I care?

Modern electric appliances that run on heat pumps are better for the environment – in fact, they are 3X more efficient than their fossil-fueled counterparts. And don’t be mistaken, we’re not talking about your grandma’s old school electric resistance HVAC. Heat pumps are the cool, new kids on the block, and WAY more efficient than any other option available today.

Rather than burning stuff to heat your home, you can begin making the switch to reduce your carbon footprint today. A heat pump does exactly that – removes the harmful output of fossil fuels burning in your home and replaces it with the air that simply exists around your home. Plus, if you weatherize, you’re ensuring that you’re living in accordance with your parent’s favorite adage – “don’t heat or cool the whole neighborhood! Shut that door!”

Saving you dollars and solving climate change

Did you know that the average homeowner can save 7 metric tons of CO2 every year by switching to a heat pump? In comparison, you’d save about 1 metric ton of CO2 every year by going fully vegan. Slashing your carbon emissions without ever leaving the house sounds good to us!

And it’s not just reducing your emissions, it’s reducing your spending, too! Because of the high efficiency of these appliances, the average homeowner who switches from a furnace to an air source heat pump will save about $1000 or more a year on utility bills.

The icing on top is that there are incredible incentives available to help offset the cost of installing a heat pump in your home. Thanks to the Inflation Reduction Act (IRA), there are Federal incentives available to everyone in the U.S..  And, in many places, there are also state, and even local rebates available (Colorado and Massachusetts where we operate are two examples).

Mona Lisa Saperstein from Parks and Rec saying "Me to the IRA: Money pleeeease"

Heat pumps are a well-loved technology across the United States and around the world (including in cold climates)! Ready to upgrade to a climate-friendly home? Join us in building a brighter future by electrifying everything, starting with homes. Your choice today shapes our collective tomorrow!
Heat Pump Water Heater DIY Maintenance + Guides

Heat pump water heaters are the energy-efficient alternative to traditional electric or gas-powered water heaters. They provide significant savings on your utility bills while also reducing carbon emissions – we love a double-duty worker! As with any home appliance, proper maintenance is important to be sure your heat pump is operating at its optimal performance and will last a long time. Below, we’re sharing our best tips and tricks to perform some DIY maintenance on your heat pump water heater, showcasing our printable heat pump water heater guides, as well as letting you know when it’s time to call in the big dogs (that’s us. The big Elephants?)

Understanding Your Heat Pump Water Heater:

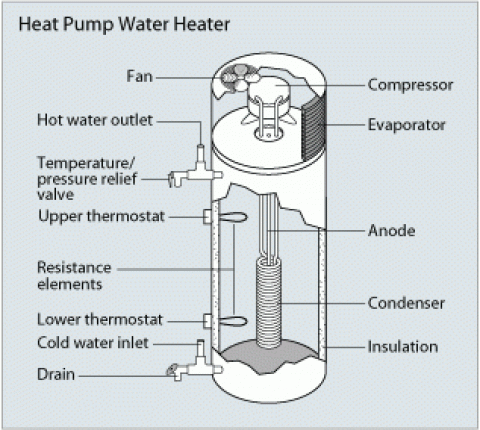
Before we dive into the depths of all that your heat pump water heater has to offer, we think it’s even more important you know the basic functions of how it works. Instead of relying on conventional direct heating elements or burners like a gas or electric water heater, heat pump water heaters extract heat from the ambient air around it and transfers that heat into the water tank. This process utilizes the components inside of the heat pump water heater, like the compressor, refrigerant, and the tank itself that stores hot water. Making sure that all of these items are at their best ensures optimal efficiency for your heat pump water heater for years to come.

Tips for Heat Pump Water Heater Self-Maintenance:

Heat pump water heater parts - image source Woodfin

1 – Regularly Check and Clean Air Filters:

Your heat pump water heater has an air filter, which works to prevent dust and debris from accumulating on the coils. By checking these filters regularly (we’re talking monthly, set a calendar reminder!) and cleaning them out, you’ll maintain optimal airflow. If you find cleaning isn’t doing the trick, be sure to order replacement filters. Restricted airflow will reduce your heat pump water heater’s efficiency along with increasing energy consumption.

2 – Inspect and Clean Condenser and Evaporator Coils:

Heat is transferred in your water heater via the condenser and evaporator coils, and if dust and dirt build up on them, it will reduce your water heater’s efficiency. By inspecting the coils on your heat pump water heater, you can ensure they’re clean and efficient. The coils can be cleaned with a soft brush or a vacuum cleaner – be sure to avoid harsh chemicals or any abrasive materials as they can easily damage the coils.

3 – Maintain Adequate Clearance:

When your heat pump water heater is installed by Elephant Energy, we make sure it has adequate clearance surrounding it to allow for proper airflow. It’s up to you to keep it up – remove any obstructions like boxes, furniture, or debris that can block and restrict airflow to the unit. It’s crucial for the heat pump water heater’s function that you have optimal heat exchange and efficiency, so find a new spot to stack up your holiday decorations and boxes of photo albums!

4 – Check the Anode Rod:

The anode rod for your heat pump water heater is a sacrificial component that helps prevent corrosion inside the water heater tank. Inspect the anode rod annually and replace it if it’s corroded or worn out. A correctly functioning anode rod can extend the lifespan of your water heater and prevent costly tank repairs down the road.

5 – Monitor Temperature and Pressure:

Regularly check the temperature and pressure relief valve on your heat pump water heater to ensure it’s functioning correctly. Test the valve by lifting the lever briefly to release a small amount of water. If the valve fails to operate or leaks persistently, replace it immediately to prevent potential water hazards.

6 – Flush the Tank Annually:

Over time, sediment and mineral deposits can accumulate at the bottom of the heat pump water heater tank, reducing its efficiency and lifespan. By draining and flushing the tank annually, you’ll remove these deposits and maintain optimal performance. Follow the manufacturer’s instructions for draining and flushing your specific model.

7 – Insulate Hot Water Pipes:

Insulating the hot water pipes connected to your heat pump water heater can help reduce heat loss and improve overall efficiency. Use foam pipe insulation sleeves to cover exposed pipes, especially in unheated areas such as basements or crawl spaces. 

Looking for more information regarding best practices, frequently asked questions, and troubleshooting? Download our user guides, made in house by our team of HVAC experts, here:

AO Smith (Model HPTU-80)
Rheem (Model PROPH5)

When to Call in the Experts:

As listed above, there’s a ton you can do as a homeowner to maintain your heat pump water heater by yourself. However, it’s good to know what situations call for professional experience:

1 – Electrical or Mechanical Issues:

If you encounter any electrical or mechanical problems with your heat pump water heater, such as compressor failure or motor issues, it’s best to contact a qualified HVAC technician. Attempting to repair complex components without proper training and tools can be dangerous and may void your warranty.

2 – Warranty Coverage:

By choosing Elephant Energy to install your heat pump water heater, you’ll receive a one year labor warranty. You’ve also got a ten year parts warranty for any part or equipment failures. Keep in mind, it’s imperative that you follow the manufacturer’s recommended maintenance guidelines and seek authorized service providers for repairs. Attempting DIY repairs or neglecting maintenance could void your warranty and leave you liable for repair costs.

Continual, regular maintenance is key to both maximizing the performance and lifespan of your heat pump water heater as well as ensuring you’re keeping a climate-friendly home running its best. Take the time to read and revisit this guide for our DIY tips, to download our helpful user guides, and to remind yourself when it’s best to call in the experts. With the right care and attention, your heat pump water heater will provide reliable hot water for years to come, all while helping you do your part in decarbonizing as well as saving money, too!

Ready to get started? Join us in building a brighter future by electrifying everything, starting with homes. Your choice today shapes our collective tomorrow!
Air Source Heat Pump DIY Maintenance + Guides

Being the proud owner of an air source heat pump can significantly contribute to both energy efficiency and a climate-friendly home. However, things can turn south if you aren’t keeping up with regular maintenance to ensure your heat pump’s optimal performance. We’re big fans of do-it-yourself maintenance on your products in between professional servicing to keep your air source heat pump running in tip-top shape. Follow this simple DIY maintenance guide for your heat pump to get tips and tricks on self-maintenance for your heat pump, plus get a printable option for you to use whenever you need it, along with insights on when it’s time to call an expert.

Understanding Your Air Source Heat Pump:

Before we just jump into the how-tos on self-maintaining your heat pump, it’s super important to understand how the heat pump itself operates. Essentially, your air source heat pump works by transferring heat from the outside air into your home, and vice versa to cool it in the warmer months. It’s wild to know that there’s heat outside, even when temps are in the negatives, but it’s true! There are multiple parts that work to make all of this happen in your heat pump, including a compressor, condenser, evaporator, and refrigerant lines.

Tips for Heat Pump Self-Maintenance:

1 – Regularly Clean or Replace Air Filters:

One of the simplest yet most important maintenance tasks is cleaning or replacing your heat pump’s air filters. Clogged filters restrict airflow, reducing the heat pump’s efficiency and potentially leading to system malfunctions. Check your filters monthly and clean or replace them as needed, especially during peak usage seasons. Want to see filter cleaning in action? Check out our video on how to clean your wall-mounted heat pump air filters, or see our video on how to clean your mini-split ceiling-mounted heat pump air filters.

2 – Keep Outdoor Unit Clear:

The outdoor unit of your heat pump can accumulate dirt, debris, leaves, and even snow depending on the season. Make sure that the area around your heat pump’s outdoor unit remains clear to allow proper airflow. Trim back any growth from bushes, trees, or grass, and be sure to remove any obstructions that could block airflow to the unit.

3 – Inspect and Clean Coils:

Both your heat pump’s outdoor condenser coil and indoor evaporator coil can collect dirt and dust over time, hindering heat transfer. By periodically inspecting these coils and cleaning them, you’ll ensure efficient performance. For the outdoor unit, you can use a hose. Make sure you’re gentle to avoid damaging the fins. For the indoor unit, use a soft brush or vacuum cleaner.

4 – Check and Clean Drainage System:

A clogged condensate drain on your heat pump can cause water leakage or potentially even water damage to your home, and that’s no good! Inspect the condensate drain regularly and be sure to remove any obstructions using a vacuum or a mixture of water and mild detergent. Ensuring proper drainage prevents future issues.

5 – Monitor Refrigerant Levels:

While refrigerant leaks are very uncommon, it’s essential to monitor the refrigerant levels periodically to be sure nothing fishy’s happening with your heat pump. Low refrigerant levels may indicate a leak or other issues that require professional attention. If you notice a significant decrease in cooling or heating efficiency, contact the team at Elephant Energy to inspect and recharge the refrigerant as needed.

6 – Test Thermostat and Controls:

Regularly test your thermostat and heat pump controls to ensure they’re functioning correctly. Sometimes, it can be as simple as replacing the batteries in your thermostat if you’re having issues. You’ll also want to ensure that the settings are appropriate for your climate-friendly home’s needs.

7 – Lubricate Moving Parts:

Some components of your air source heat pump, such as fan motors and bearings, may require lubrication to reduce friction and ensure smooth operation. Refer to your owner’s manual for guidance on lubrication intervals and the type of lubricant to use.

Take a look at our best practices, FAQs, and troubleshooting tips for your heat pump from our team here:

Mitsubishi Heat Pump User Guide
includes: Mitsubishi PUZ, Mitsubishi MXZ-SM/PVFY, Mitsubishi MXZ36-SVZ24, and Mitsubishi MXZ36

When to Call in the Experts:

While self-maintenance can help keep your air source heat pump in good condition, there are certain situations where professional assistance is necessary. Good news – we’re only a phone call or email away!

1 – Complex Repairs:

If you encounter any issues beyond basic maintenance tasks, such as compressor failure, refrigerant leaks, or electrical problems, it’s best to contact the team at Elephant, where we have qualified HVAC technicians ready to help. Attempting complex repairs without proper training and equipment can lead to further damage or safety hazards.

2 – Annual Professional Servicing:

We’re huge supporters of you performing DIY maintenance on your heat pump, but annual professional service can cover the more difficult and complex maintenance needs! During these service visits, a technician will conduct thorough inspections, tune-ups, and system diagnostics to ensure your heat pump is running at its best and proactively address any issues they may see with an expert eye.

3 – Warranty Coverage:

By installing your heat pump with Elephant Energy, you’ll automatically receive a one year warranty for labor. Our Mitsubishi heat pumps that we install also come with a 12- year manufacturer’s warranty. Plus, the Elephant Energy Maintenance + Extended Labor Warranty Packages are a great way to ensure the investment on your heat pump is well-maintained.

Elephant Energy maintenance plan

Following the manufacturer’s recommended maintenance guidelines while also relying on authorized service providers will preserve your warranty coverage. Remember – attempting large DIY repairs yourself or neglecting maintenance overall can void your warranty, so be sure you’re taking close care!

Maintaining your air source heat pump is crucial for maximizing its efficiency, lifespan, and performance. By following the tips and tricks outlined in this guide, you can perform basic maintenance tasks yourself and while keeping your heat pump running smoothly. However, remember to seek professional assistance for complex repairs and schedule annual servicing to address any underlying issues and ensure long-term reliability. With proper care and attention, your air source heat pump can continue to provide efficient heating and cooling for years to come.

Ready to get started? Join us in building a brighter future by electrifying everything, starting with homes. Your choice today shapes our collective tomorrow!

General HVAC Maintenance for your Seasonal Cleaning

We’ve all heard of March Madness, of course we’ve all heard of spring cleaning, and if we own a home, we know what an HVAC system is. Here at Elephant Energy, we’ve decided to combine the three into one perfect mashup: March Maintenance!

Our appliances are kind of like us – they need a seasonal checkup. Regularly maintaining your heating, ventilation, and air conditioning (commonly referred to as HVAC) systems ensures that they will live a long, quality life before it’s time to replace them. Beyond hosting a retirement party for your furnace (or maybe you’re more into the festive idea of a second line funeral a la New Orleans? We’re not here to judge!), doing some basic check-ups will make sure your home is safe and healthy. And when it’s time to replace your gas furnace, air conditioner, or central air, remember that we’re here to help with the all-in-one powerhouse of a cold climate heat pump!

If you haven’t yet electrified, read on to find instructions on how to do basic maintenance of your HVAC systems. Performing this maintenance in the spring and fall will help you feel more comfortable working with your HVAC systems (and may clue you in on when it’s time to say goodbye to gas and upgrade to electric instead!)

Jump to:

Gas Furnace Maintenance:

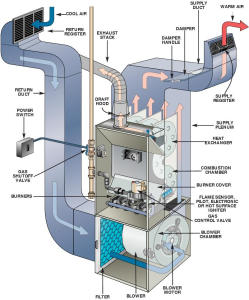
Gas furnace parts, image from Technical Hot and Cold Parts

  • Safety First: Step one in all of the processes we’re about to share is to turn off power to each appliance. This will prevent any accidental starts and will ensure your safety as you get down to business.
  • Replace Air Filters: A simple task that is often overlooked (yes, even if your smart thermostat reminds you!) is replacing the air filters for your gas furnace. Clogged or dirty air filters can block airflow, decrease your gas furnace’s efficiency, and even lead to serious system malfunctions. Your filter type should be visible on the one already inserted, so be sure to buy the same size. They’re recommended to be changed at least every three months, so don’t skip it. (An easy way to remember – change it on each “first day” of a season.)
  • Clean Vents and Ducts: Your vents and ducts are what move heat from your gas furnace around your house. Ensuring proper airflow is important for the furnace’s function. You can use a simple vacuum with a hose attachment or even a soft brush to remove dust and debris from the vents and ducts. They can be screwed on and off if you want to reach a little deeper. This will both improve air flow and ensure good air quality. Don’t skip this step, especially if you’ve got pets! Their fur will find a way to get into every nook and cranny.
  • Inspect and Clean Burners: Did you know your gas furnace has burners? (This is why we recommend switching to a heat pump – we prefer to not burn fossil fuels in our homes!) Back to cleaning – over time, the burners in your gas furnace may accumulate debris or develop rust, affecting their performance. Referring to your gas furnace’s manual, you can carefully remove the burner assembly and look closely for any signs of corrosion or blockages. Use a soft brush to clean the burners gently, making sure you see no obstructions or broken parts, then put back on.
  • Check Pilot Light: If your gas furnace is equipped with a pilot light, ensure it’s lit and burning steadily. If the pilot light keeps extinguishing, it may indicate a problem with the thermocouple or gas supply, which requires professional attention. Don’t try to fix the pilot light yourself!
  • Inspect Flue Pipe: The flue pipe’s job is to vent exhaust gasses safely out of your home. You definitely want to be sure this is in working shape. The flue pipe is often on the top or rear of most gas furnaces. Inspect the flue pipe for any signs of damage, corrosion, or blockages. If you see any obstructions, clear them out of the way with a soft brush and be sure to wear gloves. This will ensure proper ventilation and prevent the risk of carbon monoxide buildup.
  • Inspect and Lubricate Blower Motor: The blower motor plays a crucial role in distributing heated air throughout your home. It’s usually located next to your gas furnace’s air filter. Inspect the blower motor for any signs of wear and tear, which can look like worn bearings or loose belts. If necessary, lubricate the motor according to the manufacturer’s instructions (check your gas furnace’s manual) to ensure smooth operation.
  • Check Thermostat: Finally, test your thermostat to ensure it’s functioning correctly. Replace the batteries if needed, and calibrate the thermostat to ensure accurate temperature readings. We’re big fans of smart thermostats that are programmable for greater energy savings. Hey! That’s a good step toward a Climate-Friendly Home.

Window Unit AC Maintenance:

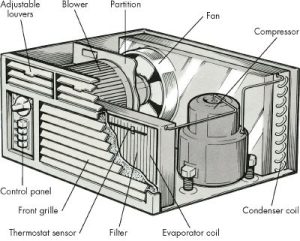
Window unit air conditioner, image from How Stuff Works

  • Safety Precautions: Just as we promised above, before beginning any of your maintenance tasks for your window AC unit, be sure the power is turned off and the unit is unplugged from the electrical outlet.
  • Clean or Replace Air Filter: Similar to gas furnaces, window unit air conditioners rely on clean air filters for efficient operation. Remove the filter from the unit and inspect it for dirt, dust, and debris. If the filter is washable, rinse it with water and mild detergent, then allow it to dry completely before reinstalling. If the filter is disposable, replace it with a new one according to the manufacturer’s recommendations.
  • Clean Evaporator and Condenser Coils: Over time, dirt and debris can build up on both the evaporator and condenser coils, blocking heat exchange which reduces cooling efficiency. Carefully remove the front cover of your window unit AC to access the coils. Use a soft brush or vacuum cleaner with a brush attachment to gently remove dirt and debris from the coils. Be careful not to bend or damage the delicate fins of the coils during cleaning.
  • Check and Clean Drainage Holes: Proper drainage is essential for preventing water buildup and potential damage to your window unit AC. Inspect the drainage holes located at the base of the unit and use a small brush or pipe cleaner to remove any blockages. Ensure the drainage channels are clear to allow condensate to flow freely away from the unit. If you see a lot of leakage from your window AC unit, it can actually mean your filter needs to be cleaned. Good thing we’ve taken care of that already!
  • Inspect Window Seal: A tight seal around the window unit AC helps prevent warm air from entering your home and improves energy efficiency. This rule goes for your doors and windows in general – maybe it’s a good time to check those out, too! Inspect the seal between the unit and the window frame for any signs of damage or gaps. Replace worn-out weather stripping or use foam insulation tape to create a tight seal and prevent air leaks.
  • Inspect and Tighten Screws: In general, window unit air conditioners can vibrate and move. That’s normal, don’t worry! But those vibrations can cause screws and bolts to loosen over time. Check the screws and bolts securing the window unit AC to the window frame and tighten them as needed to prevent rattling and ensure stability while it’s on.

Central Air Conditioning Maintenance:

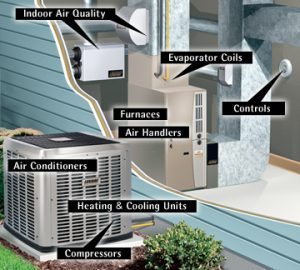
Central Air Conditioning Unit, image from Guardian Home Experts

  • Safety Needs: That’s right, you guessed it! Before you get started on your central air conditioner’s spring maintenance, turn off power to the unit. We recommend doing this at the main electrical panel as well as power to the outdoor condenser unit – this will prevent any accidental starts while you’re working on the unit.
  • Replace Air Filters: Central air conditioning systems use air filters to trap dust, pollen, and other airborne particles, preventing them from circulating throughout your home. Similar to your gas furnace, you’ll want to check these filters at least quarterly. Make a party of it – filter check day!
  • Clean Outdoor Unit: The outdoor condenser unit of your central air conditioning system is exposed to the elements and can accumulate dirt, leaves, and debris over time. Did you know that you can use a garden hose to gently rinse off the exterior of the unit? Pretty cool! You’ll want to be sure you’re removing any visible dirt and debris. Be careful not to use high-pressure water, as it can damage the delicate fins of the condenser coils.
  • Inspect Refrigerant Lines: The refrigerant lines carry refrigerant between the indoor and outdoor units of your central air conditioning system. We recommend inspecting the refrigerant lines for any signs of damage, such as cracks, kinks, or leaks. If you notice any issues, contact a qualified HVAC technician to assess and repair the problem, as working with refrigerant requires specialized equipment and training.
  • Check Thermostat: Just as you did after servicing your gas furnace, test the thermostat to ensure it’s accurately reading the temperature and cycling the central air conditioning system on and off as needed. Of course, we’ll recommend you replace the batteries if necessary and calibrate the thermostat to ensure precise temperature control throughout your home.
  • Inspect Ductwork: Leaky ducts both waste energy and reduce the efficiency of your central air conditioning system. You can self-inspect the ductwork for any signs of damage, such as tears, holes, or disconnected joints. Seal any leaks with duct tape (hey, THAT’S where the name comes from!) or mastic sealant to improve airflow and energy efficiency. If you’ve got a lot of ductwork issues, call an expert to come take a look.

Remember, regular maintenance of your HVAC systems is what helps you elongate the life of your appliances. With proper maintenance and care, you’re guaranteeing the length of your appliance’s life. However, when you’re ready to make the transition to #ElectrifyEverything, we’ll be here to get you started on your journey. If you finish servicing your systems and think now’s the time to throw a retirement party for your furnace or AC units, get started on Your Electrification Roadmap today!

What is an Electric Fireplace?

As the temperatures drop and the leaves begin to change, creating a warm and cozy atmosphere in your home becomes a top priority. That’s why now is the perfect time to consider upgrading your fireplace, or to at least become educated on the less-expensive, energy-efficient alternative: electric fireplaces.

Continue reading “What is an Electric Fireplace?”