We’ve all heard of March Madness, of course we’ve all heard of spring cleaning, and if we own a home, we know what an HVAC system is. Here at Elephant Energy, we’ve decided to combine the three into one perfect mashup: March Maintenance!
Our appliances are kind of like us – they need a seasonal checkup. Regularly maintaining your heating, ventilation, and air conditioning (commonly referred to as HVAC) systems ensures that they will live a long, quality life before it’s time to replace them. Beyond hosting a retirement party for your furnace (or maybe you’re more into the festive idea of a second line funeral a la New Orleans? We’re not here to judge!), doing some basic check-ups will make sure your home is safe and healthy. And when it’s time to replace your gas furnace, air conditioner, or central air, remember that we’re here to help with the all-in-one powerhouse of a cold climate heat pump!
If you haven’t yet electrified, read on to find instructions on how to do basic maintenance of your HVAC systems. Performing this maintenance in the spring and fall will help you feel more comfortable working with your HVAC systems (and may clue you in on when it’s time to say goodbye to gas and upgrade to electric instead!)
Jump to:
Gas Furnace Maintenance:

- Safety First: Step one in all of the processes we’re about to share is to turn off power to each appliance. This will prevent any accidental starts and will ensure your safety as you get down to business.
- Replace Air Filters: A simple task that is often overlooked (yes, even if your smart thermostat reminds you!) is replacing the air filters for your gas furnace. Clogged or dirty air filters can block airflow, decrease your gas furnace’s efficiency, and even lead to serious system malfunctions. Your filter type should be visible on the one already inserted, so be sure to buy the same size. They’re recommended to be changed at least every three months, so don’t skip it. (An easy way to remember – change it on each “first day” of a season.)
- Clean Vents and Ducts: Your vents and ducts are what move heat from your gas furnace around your house. Ensuring proper airflow is important for the furnace’s function. You can use a simple vacuum with a hose attachment or even a soft brush to remove dust and debris from the vents and ducts. They can be screwed on and off if you want to reach a little deeper. This will both improve air flow and ensure good air quality. Don’t skip this step, especially if you’ve got pets! Their fur will find a way to get into every nook and cranny.
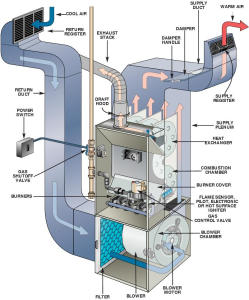
- Inspect and Clean Burners: Did you know your gas furnace has burners? (This is why we recommend switching to a heat pump – we prefer to not burn fossil fuels in our homes!) Back to cleaning – over time, the burners in your gas furnace may accumulate debris or develop rust, affecting their performance. Referring to your gas furnace’s manual, you can carefully remove the burner assembly and look closely for any signs of corrosion or blockages. Use a soft brush to clean the burners gently, making sure you see no obstructions or broken parts, then put back on.
- Check Pilot Light: If your gas furnace is equipped with a pilot light, ensure it’s lit and burning steadily. If the pilot light keeps extinguishing, it may indicate a problem with the thermocouple or gas supply, which requires professional attention. Don’t try to fix the pilot light yourself!
- Inspect Flue Pipe: The flue pipe’s job is to vent exhaust gasses safely out of your home. You definitely want to be sure this is in working shape. The flue pipe is often on the top or rear of most gas furnaces. Inspect the flue pipe for any signs of damage, corrosion, or blockages. If you see any obstructions, clear them out of the way with a soft brush and be sure to wear gloves. This will ensure proper ventilation and prevent the risk of carbon monoxide buildup.
- Inspect and Lubricate Blower Motor: The blower motor plays a crucial role in distributing heated air throughout your home. It’s usually located next to your gas furnace’s air filter. Inspect the blower motor for any signs of wear and tear, which can look like worn bearings or loose belts. If necessary, lubricate the motor according to the manufacturer’s instructions (check your gas furnace’s manual) to ensure smooth operation.
- Check Thermostat: Finally, test your thermostat to ensure it’s functioning correctly. Replace the batteries if needed, and calibrate the thermostat to ensure accurate temperature readings. We’re big fans of smart thermostats that are programmable for greater energy savings. Hey! That’s a good step toward a Climate-Friendly Home.
Window Unit AC Maintenance:

- Safety Precautions: Just as we promised above, before beginning any of your maintenance tasks for your window AC unit, be sure the power is turned off and the unit is unplugged from the electrical outlet.
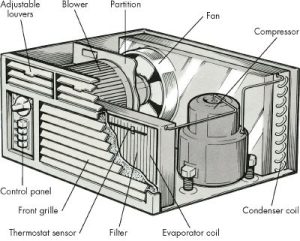
- Clean or Replace Air Filter: Similar to gas furnaces, window unit air conditioners rely on clean air filters for efficient operation. Remove the filter from the unit and inspect it for dirt, dust, and debris. If the filter is washable, rinse it with water and mild detergent, then allow it to dry completely before reinstalling. If the filter is disposable, replace it with a new one according to the manufacturer’s recommendations.
- Clean Evaporator and Condenser Coils: Over time, dirt and debris can build up on both the evaporator and condenser coils, blocking heat exchange which reduces cooling efficiency. Carefully remove the front cover of your window unit AC to access the coils. Use a soft brush or vacuum cleaner with a brush attachment to gently remove dirt and debris from the coils. Be careful not to bend or damage the delicate fins of the coils during cleaning.
- Check and Clean Drainage Holes: Proper drainage is essential for preventing water buildup and potential damage to your window unit AC. Inspect the drainage holes located at the base of the unit and use a small brush or pipe cleaner to remove any blockages. Ensure the drainage channels are clear to allow condensate to flow freely away from the unit. If you see a lot of leakage from your window AC unit, it can actually mean your filter needs to be cleaned. Good thing we’ve taken care of that already!
- Inspect Window Seal: A tight seal around the window unit AC helps prevent warm air from entering your home and improves energy efficiency. This rule goes for your doors and windows in general – maybe it’s a good time to check those out, too! Inspect the seal between the unit and the window frame for any signs of damage or gaps. Replace worn-out weather stripping or use foam insulation tape to create a tight seal and prevent air leaks.
- Inspect and Tighten Screws: In general, window unit air conditioners can vibrate and move. That’s normal, don’t worry! But those vibrations can cause screws and bolts to loosen over time. Check the screws and bolts securing the window unit AC to the window frame and tighten them as needed to prevent rattling and ensure stability while it’s on.
Central Air Conditioning Maintenance:

- Safety Needs: That’s right, you guessed it! Before you get started on your central air conditioner’s spring maintenance, turn off power to the unit. We recommend doing this at the main electrical panel as well as power to the outdoor condenser unit – this will prevent any accidental starts while you’re working on the unit.
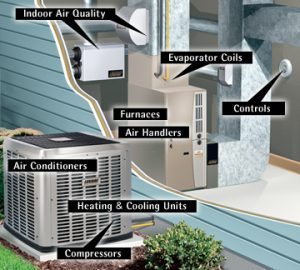
- Replace Air Filters: Central air conditioning systems use air filters to trap dust, pollen, and other airborne particles, preventing them from circulating throughout your home. Similar to your gas furnace, you’ll want to check these filters at least quarterly. Make a party of it – filter check day!
- Clean Outdoor Unit: The outdoor condenser unit of your central air conditioning system is exposed to the elements and can accumulate dirt, leaves, and debris over time. Did you know that you can use a garden hose to gently rinse off the exterior of the unit? Pretty cool! You’ll want to be sure you’re removing any visible dirt and debris. Be careful not to use high-pressure water, as it can damage the delicate fins of the condenser coils.
- Inspect Refrigerant Lines: The refrigerant lines carry refrigerant between the indoor and outdoor units of your central air conditioning system. We recommend inspecting the refrigerant lines for any signs of damage, such as cracks, kinks, or leaks. If you notice any issues, contact a qualified HVAC technician to assess and repair the problem, as working with refrigerant requires specialized equipment and training.
- Check Thermostat: Just as you did after servicing your gas furnace, test the thermostat to ensure it’s accurately reading the temperature and cycling the central air conditioning system on and off as needed. Of course, we’ll recommend you replace the batteries if necessary and calibrate the thermostat to ensure precise temperature control throughout your home.
- Inspect Ductwork: Leaky ducts both waste energy and reduce the efficiency of your central air conditioning system. You can self-inspect the ductwork for any signs of damage, such as tears, holes, or disconnected joints. Seal any leaks with duct tape (hey, THAT’S where the name comes from!) or mastic sealant to improve airflow and energy efficiency. If you’ve got a lot of ductwork issues, call an expert to come take a look.
—
Remember, regular maintenance of your HVAC systems is what helps you elongate the life of your appliances. With proper maintenance and care, you’re guaranteeing the length of your appliance’s life. However, when you’re ready to make the transition to #ElectrifyEverything, we’ll be here to get you started on your journey. If you finish servicing your systems and think now’s the time to throw a retirement party for your furnace or AC units, get started on Your Electrification RoadmapⓇ today!